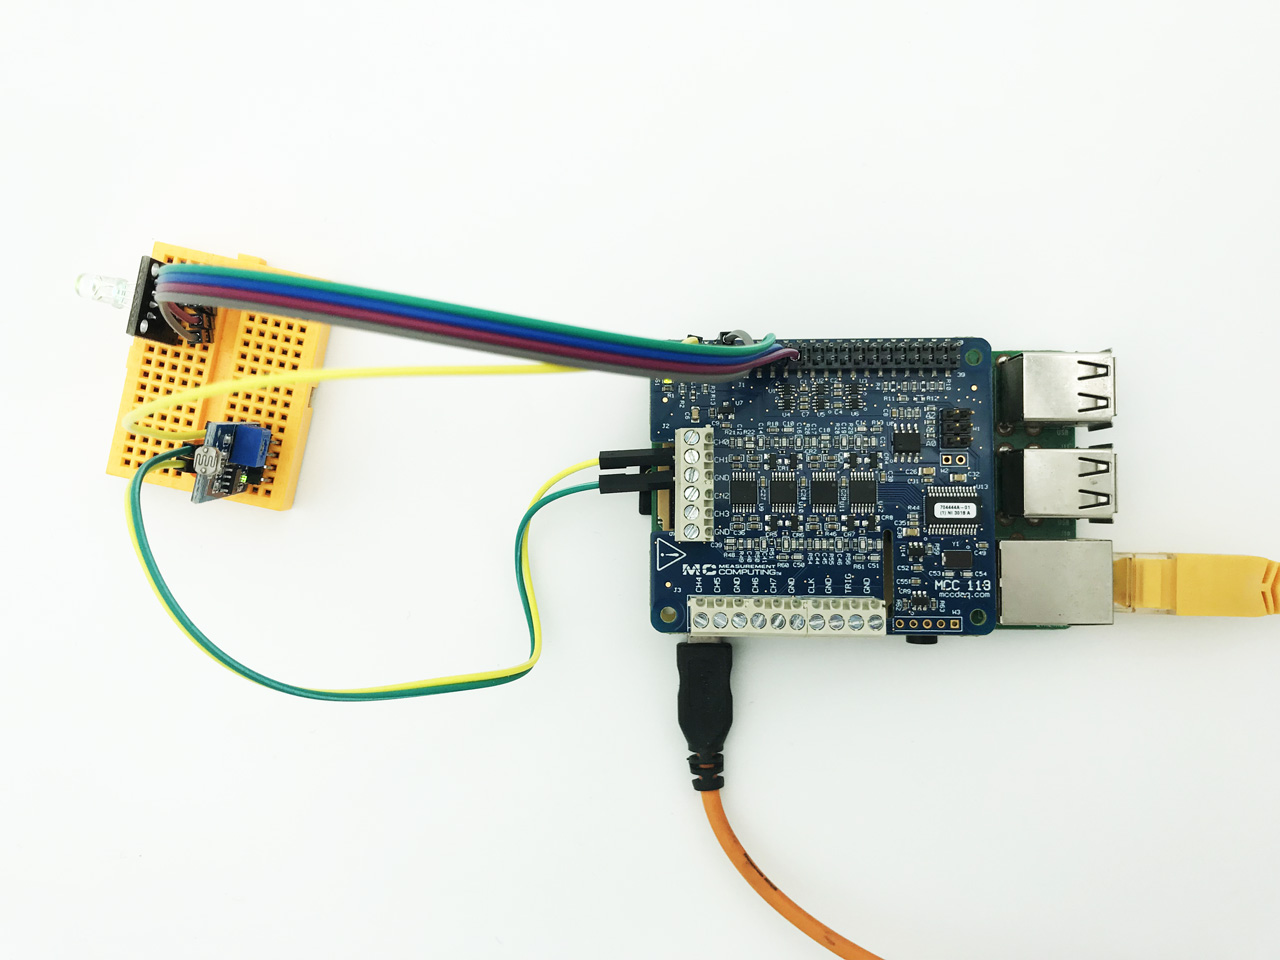
最近从树莓派实验室拿到一块 MCC 118 DAQ 扩展板的试用,这是我第一次接触专业的 DAQ 采集卡,怀着对数据采集的好奇开始摸索。
首先了解到这个板卡可以同时支持8路数据采集,但我这里暂时只需要用到其中1路来实现一个环境光线的采集。
我会使用一个安放在室外、具有模拟输出功能的光线传感器模块,采集其模拟电信号,并线性转换成一个光照的亮度指数。
在室内的一个鱼缸里,我安装了一个LED氛围灯,并尝试用采集到的室外光照亮度指数来设置这个LED氛围灯的亮度。
最终实现室内鱼缸的光照度和室外自然光照度实时同步,我的爱鱼也能实时感受到室外的天气变化了~
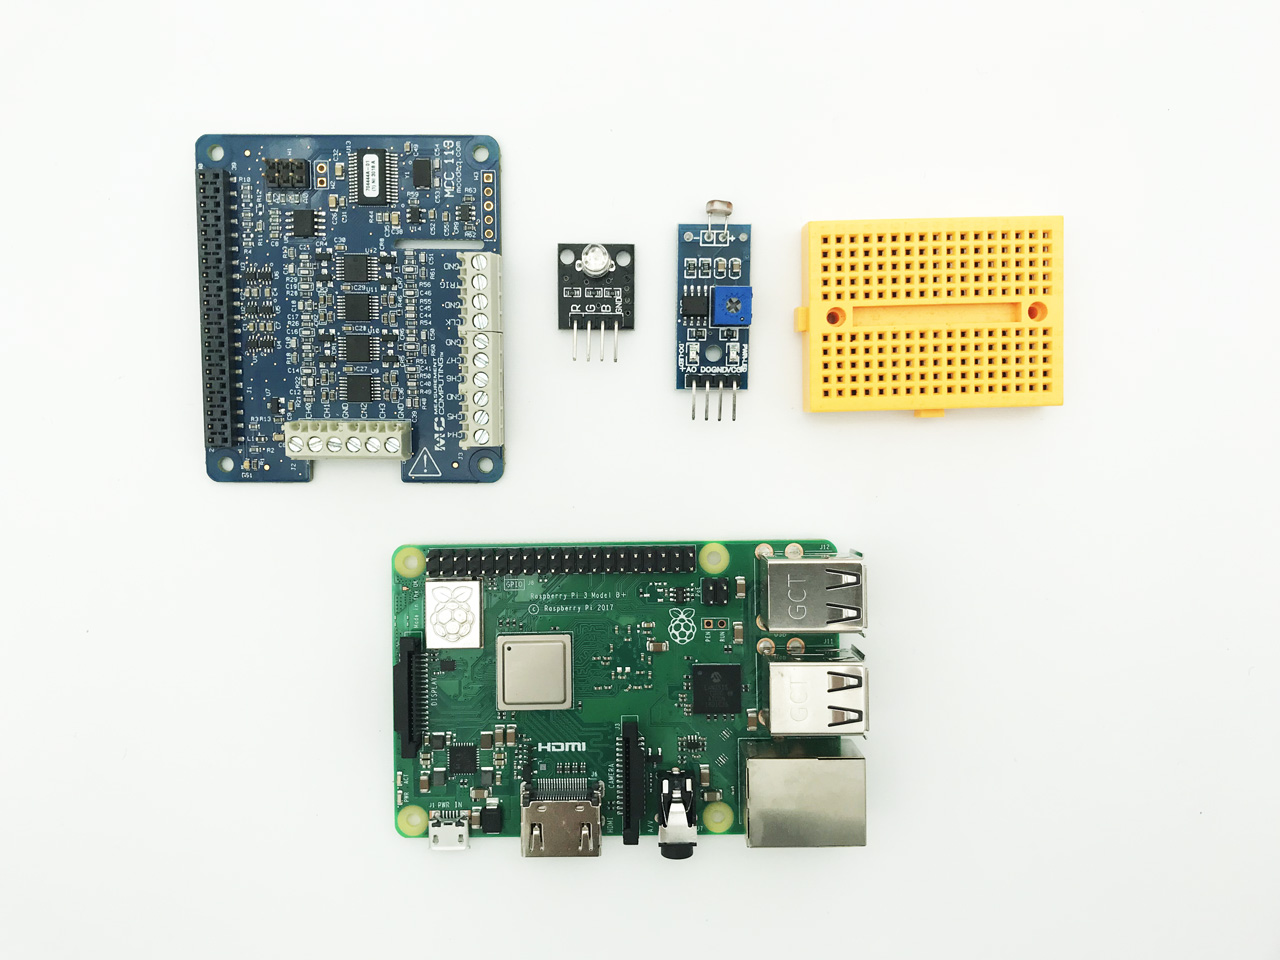
材料清单
树莓派(Raspberry Pi)一块
MCC 118 DAQ HAT 一块
光线传感器模块(带模拟输出)一个
RGB LED 模块一个(共阴或共阳,本例使用共阴)
面包板一块
杜邦线若干
瑞士军刀扩展板一块(可选)
一、安装环境
树莓派建议安装官方的 Raspbian 系统,不需要特别的配置。直接开始部署 MCC 118 配套的 SDK 和范例试试数据采集卡的工作情况,步骤如下(这里直接参考了这篇教程)。
sudo apt-get update

sudo apt-get install git

cd ~

git clone https://github.com/mccdaq/daqhats.git

cd ~/daqhats

sudo ./install.sh

pip install dash dash-renderer dash-html-components dash-core-components
二、接线
先看光线传感器模块。
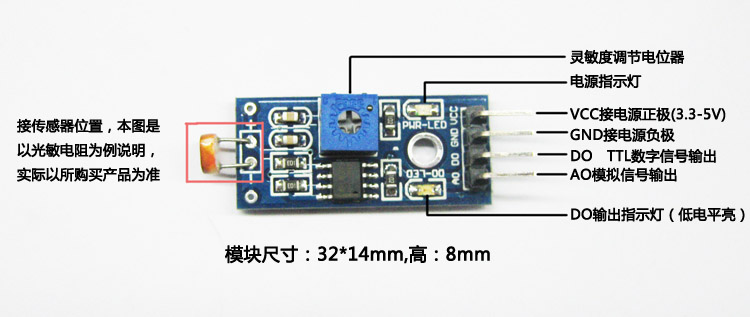
为什么用带模拟输出(AO)的光线传感器呢?是因为这款传感器如果只有数字输出(DO)的话,其输出的数据只能是高电平或低电平,只能反映光线是否达到某个设定的值,而无法反映出光线的强弱。
但树莓派本身并没有 ADC,无法直接读取模拟电信号(信号的强弱和光线强弱相关)。这时 MCC 118 DAQ 就派上用场了。
MCC 118 的排座设计将GPIO全部引出了,很方便外接其他传感器。

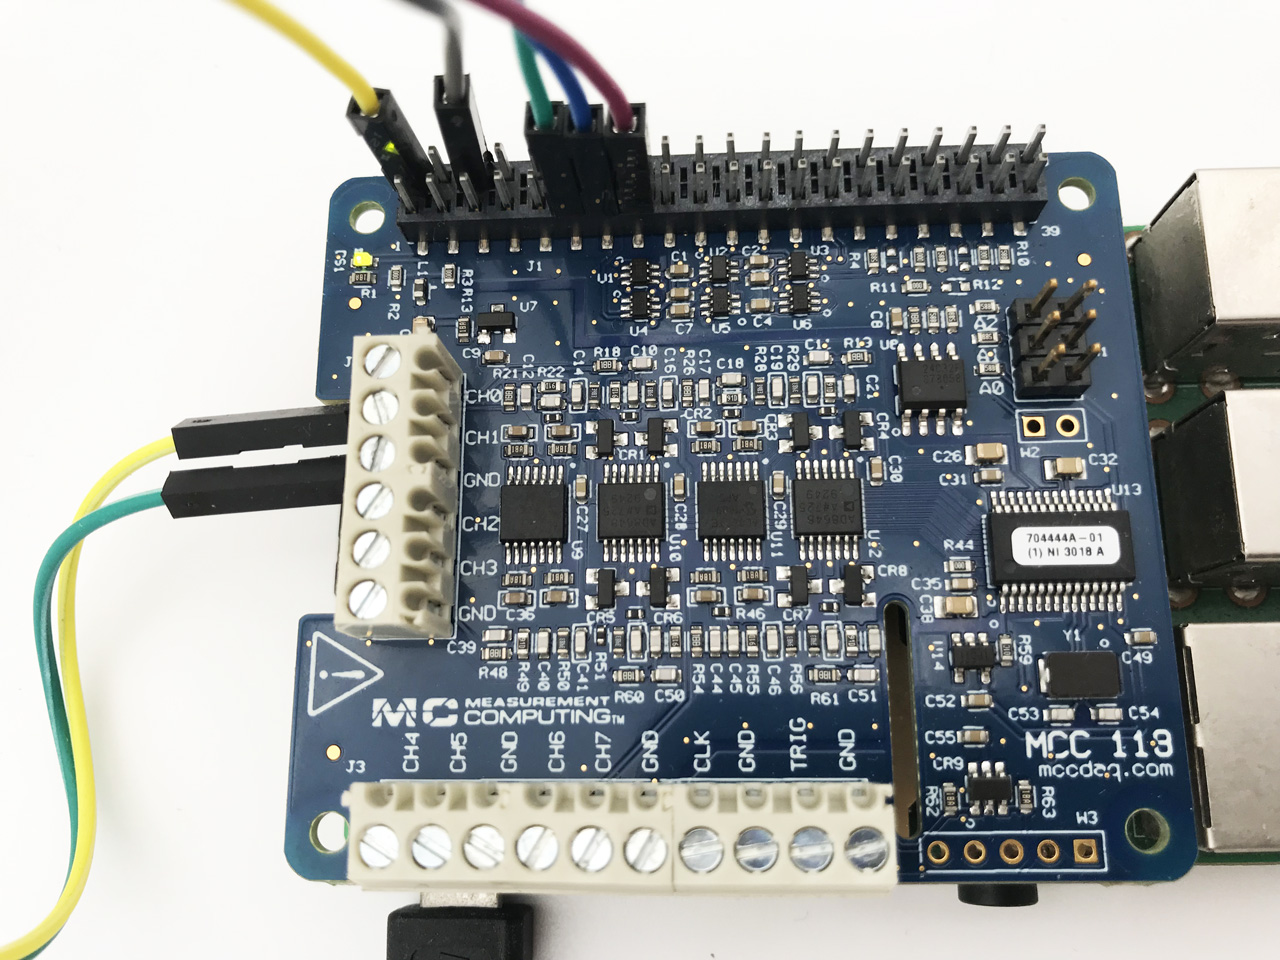

引脚连接表
光线传感器:VCC — 树莓派:5V
光线传感器:GND — MCC 118:GND
光线传感器:AO — MCC 118:CH1
RGBLED模块:GND — 树莓派:GND
RGBLED模块:R — 树莓派:BCM 17
RGBLED模块:G — 树莓派:BCM 27
RGBLED模块:B — 树莓派:BCM 22
三、测量采集和数值换算
启动 Web 波形图程序:
cd ~/daqhats/examples/python/mcc118/web_server

./web_server.py
接下来就可以在浏览器中打开 http://:8080 访问了。将其中的 替换成树莓派的 IP 地址或主机名。
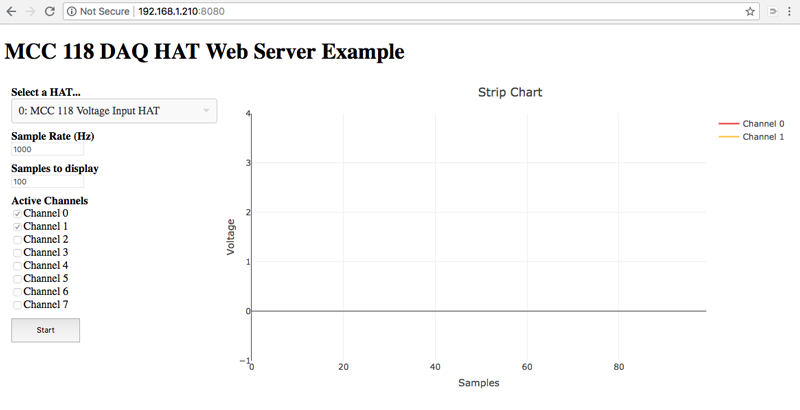
要想停止 Web 服务,可以回到命令行界面按下 Ctrl+C 中止。
首先试试看这个传感器的AO输出的电压范围,用 MCC 118 SDK 中自带的 web_server 范例可以非常方便的检测到。这是一个类似示波器的应用,启动之后在浏览器打开,选择通道1后启动数据采集,通过开关灯可以看到电压的实时变化。
通过完全遮住光线传感器的光敏电阻,看到AO输出电压最大升至5V;用手机自带闪光灯照射在光敏电阻上,看到AO输出电压最小降到0V。看来0~5V就是这个传感器的模拟电信号输出范围(图表显示的电压伏特数是精确到小数点后6位的)。
为了简化后面的程序,我把0~5V的电压范围通过简单的公式换算到 100 ~ 0 的范围内,而树莓派的 PWM 支持的参数范围也是 0 ~ 100,这样刚好可以用树莓派的 PWM 来设置 LED 的亮度。
# 从通道1读取模拟电信号(电压)

value = hat.a_in_read(1, options)

# 光照亮度指数换算

light_index = 100 - round(value * 1000 / 50)


# 根据光照亮度指数,通过 PWM 来设置LED的光照强度和颜色

# 红色光

pwmR.ChangeDutyCycle(light_index)

# 绿色光

pwmG.ChangeDutyCycle(light_index)

# 蓝色光

pwmB.ChangeDutyCycle(100)
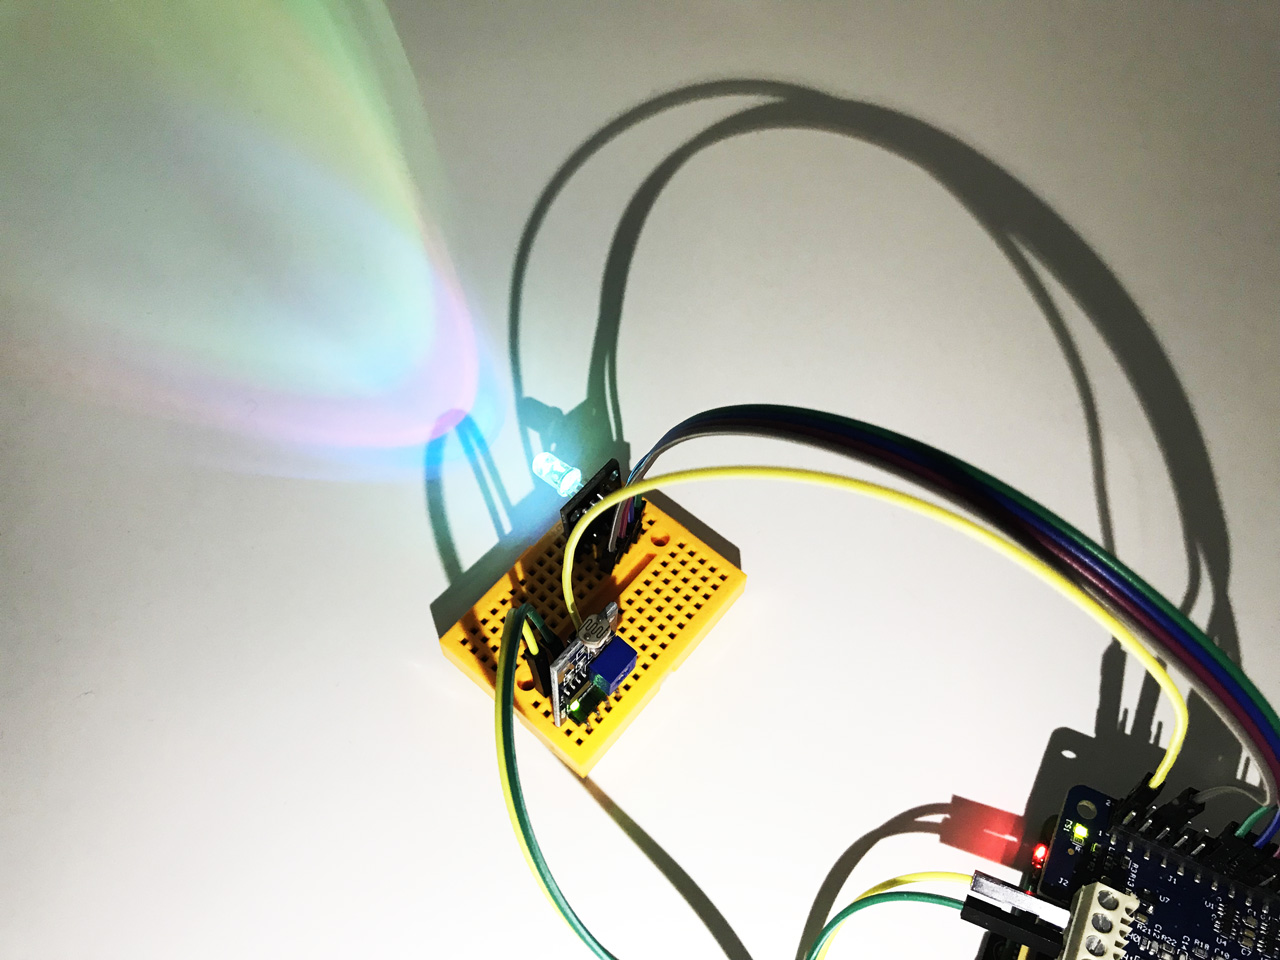
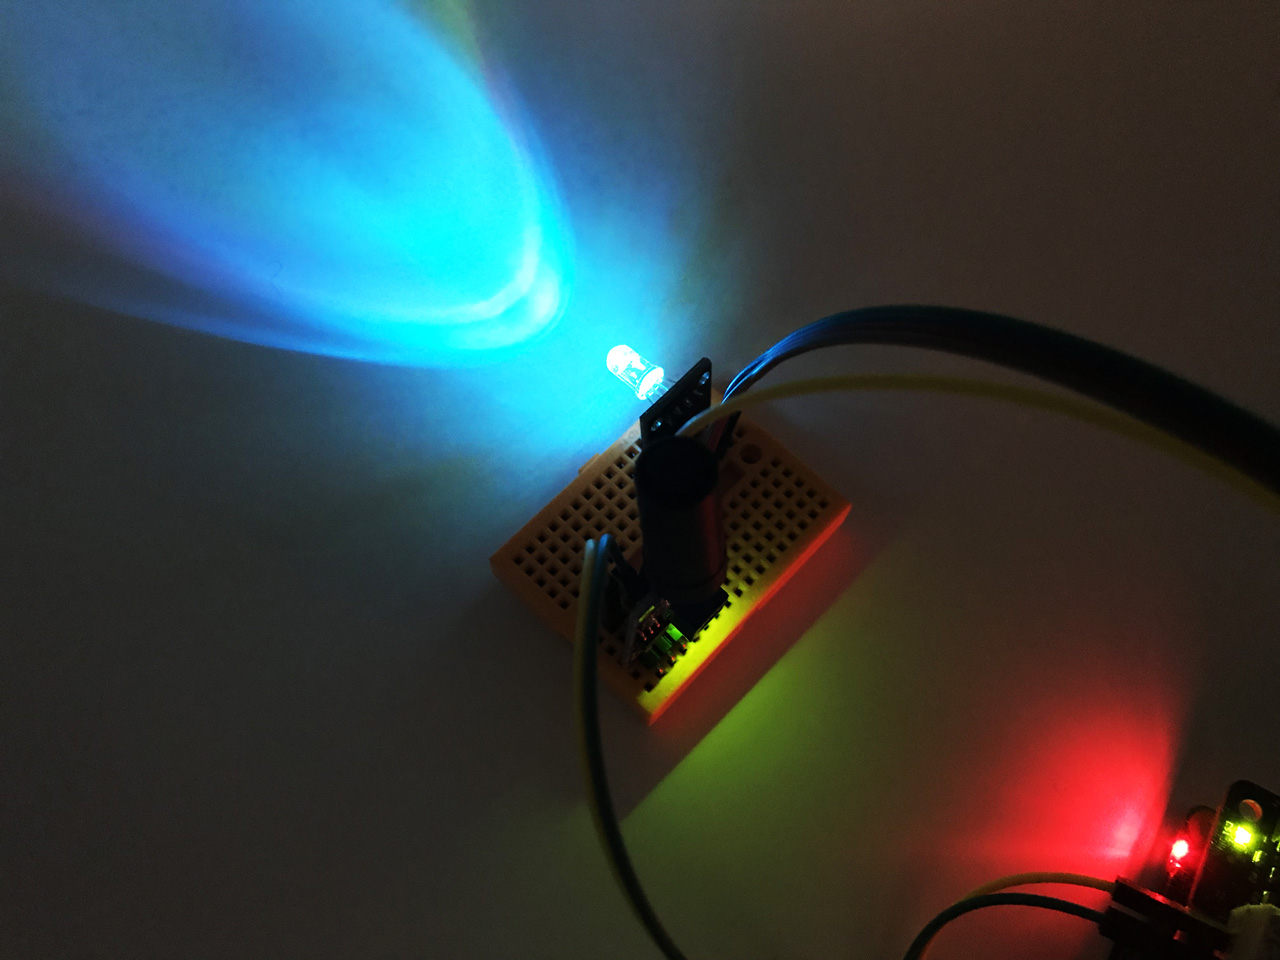
其效果是白天光线最强时鱼缸灯光达到最强的白色光,到晚间,灯光中的红色和绿色光源逐渐减弱至0,则呈现出夜晚的蓝色光氛围。
四、代码和运行
完整代码如下,这个代码是在 MCC 118 范例 single_value_read 基础上修改而来的(范例做得清晰易懂很方便修改)。
#!/usr/bin/env python

#  -*- coding: utf-8 -*-

from __future__ import print_function

from time import sleep

from sys import stdout

from daqhats_utils import select_hat_device, enum_mask_to_string

from daqhats import mcc118, OptionFlags, HatIDs, HatError


# RGBLED

import RPi.GPIO


# Constants

CURSOR_BACK_2 = '\x1b[2D'

ERASE_TO_END_OF_LINE = '\x1b[0K'


# RGBLED

R,G,B=17,27,22


RPi.GPIO.setmode(RPi.GPIO.BCM)


RPi.GPIO.setup(R, RPi.GPIO.OUT)

RPi.GPIO.setup(G, RPi.GPIO.OUT)

RPi.GPIO.setup(B, RPi.GPIO.OUT)


pwmR = RPi.GPIO.PWM(R, 70)

pwmG = RPi.GPIO.PWM(G, 70)

pwmB = RPi.GPIO.PWM(B, 70)


pwmR.start(0)

pwmG.start(0)

pwmB.start(0)


def main():

    """

    This function is executed automatically when the module is run directly.

    """

    options = OptionFlags.DEFAULT

    low_chan = 0

    high_chan = 3

    mcc_118_num_channels = mcc118.info().NUM_AI_CHANNELS

    sample_interval = 0.5  # Seconds

    light_index = 0


    try:

        # Get an instance of the selected hat device object.

        address = select_hat_device(HatIDs.MCC_118)

        hat = mcc118(address)


        print('\nMCC 118 single data value read example')

        print('    Options:', enum_mask_to_string(OptionFlags, options))

        try:

            input("\nPress 'Enter' to continue")

        except (NameError, SyntaxError):

            pass


        print('\nAcquiring data ... Press Ctrl-C to abort')


        try:

            while True:

                # Read a single value from each selected channel.

                value = hat.a_in_read(1, options)

                light_index = 100 - round(value * 1000 / 50)

                led_display(light_index)

                print('\r{:12.5} V'.format(value), '\tIndex:{:5.4}'.format(light_index), end='')


                stdout.flush()


                # Wait the specified interval between reads.

                sleep(sample_interval)


        except KeyboardInterrupt:

            # Clear the '^C' from the display.

            print(CURSOR_BACK_2, ERASE_TO_END_OF_LINE, '\n')


    except (HatError, ValueError) as error:

        print('\n', error)


    pwmR.stop()

    pwmG.stop()

    pwmB.stop()


    RPi.GPIO.cleanup()


def led_display(index):

    #print(index)

    pwmR.ChangeDutyCycle(index)

    pwmG.ChangeDutyCycle(index)

    pwmB.ChangeDutyCycle(100)


if __name__ == '__main__':

    # This will only be run when the module is called directly.

    main()
将程序代码文件 light.py 上传至树莓派,进入程序所在目录运行:
python light.py

光照强度指数最大时效果如下。
光照强度指数最小时效果如下。
应用到鱼缸(效果图)。

五、延伸应用
做这个实验的过程中在想如果 MCC 118 能自带一款显示屏用来显示采集到的实时数据就好了,后来发现手头有一款集成了数码管的瑞士军刀扩展板,刚好可以插在这个 MCC 118 引出的排针上,如图:
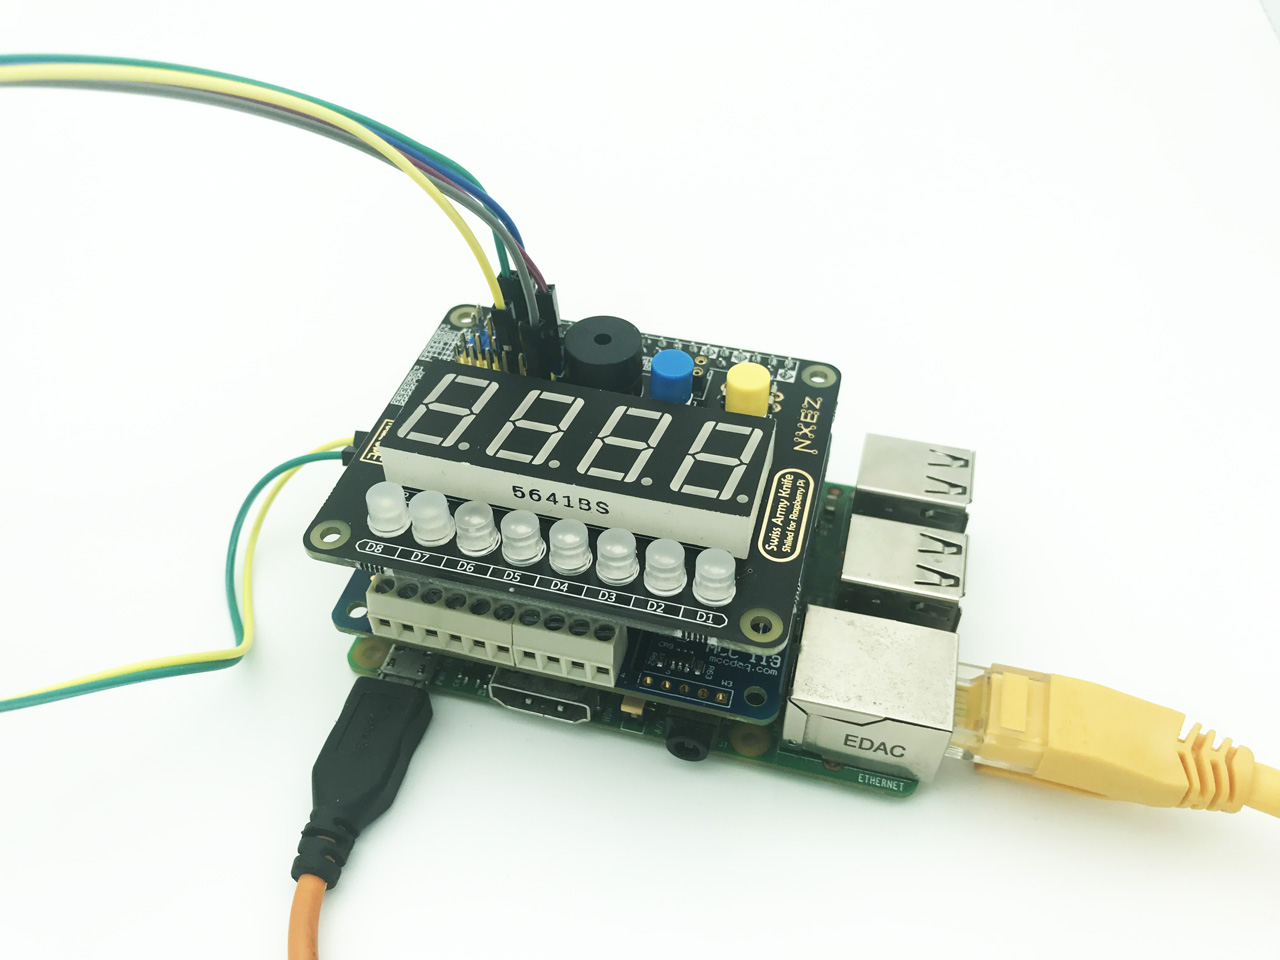
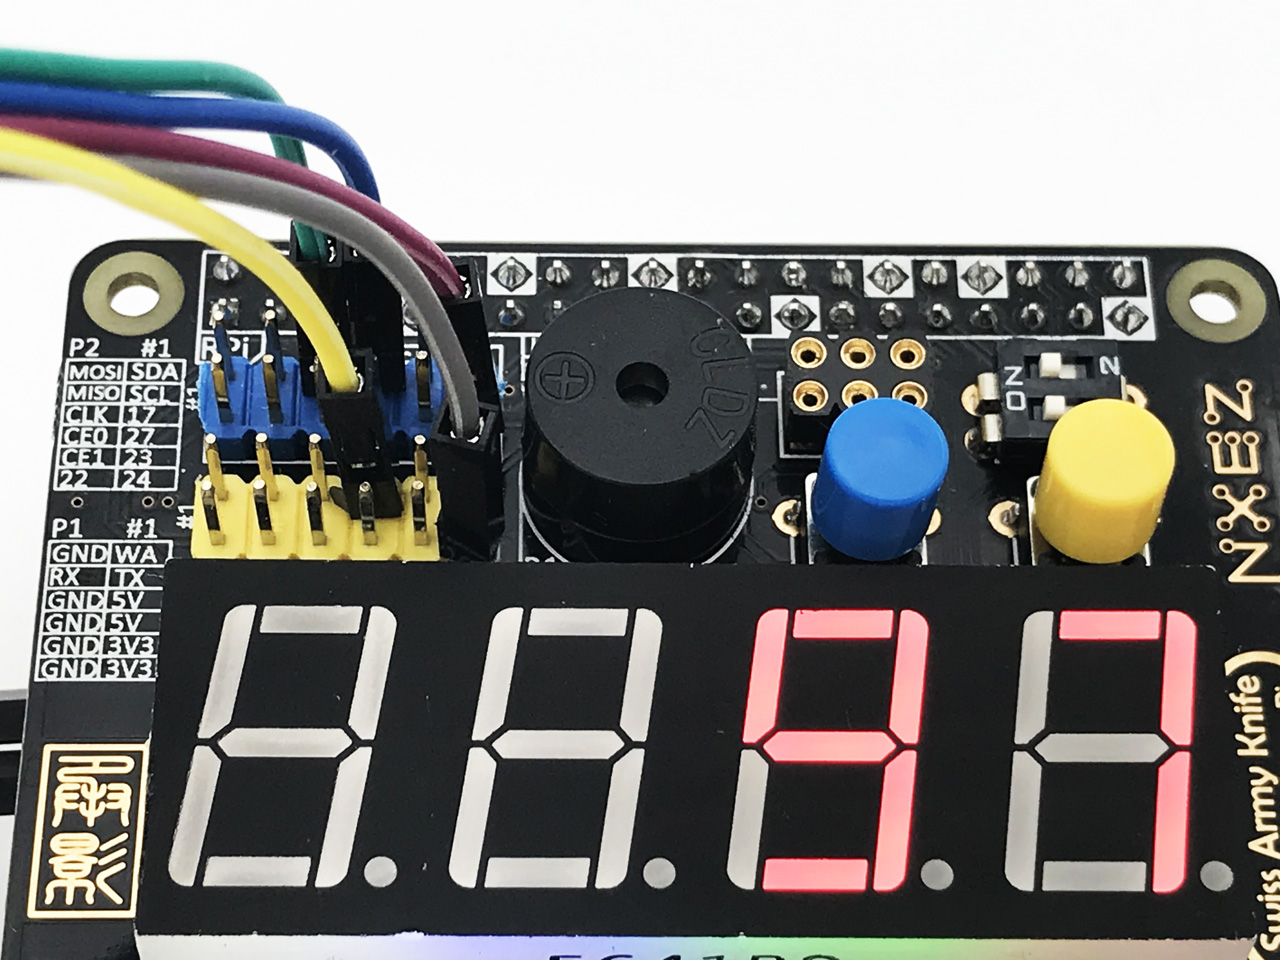

瑞士军刀扩展板也有很方便的 SDK,简单的整合了两部分代码,就实现了数码管动态显示光照强度指数,并能控制板载的8个LED实现1-8级亮度的小夜灯。
完整代码如下:
#!/usr/bin/env python

# -*- coding: utf-8 -*-

from __future__ import print_function

from time import sleep

from sys import stdout

from daqhats_utils import select_hat_device, enum_mask_to_string

from daqhats import mcc118, OptionFlags, HatIDs, HatError

from sakshat import SAKSHAT

import time


# RGBLED

import RPi.GPIO


#Declare the SAKS Board

SAKS = SAKSHAT()


# Constants

CURSOR_BACK_2 = '\x1b[2D'

ERASE_TO_END_OF_LINE = '\x1b[0K'


# RGBLED

R,G,B=17,27,22


RPi.GPIO.setmode(RPi.GPIO.BCM)


RPi.GPIO.setup(R, RPi.GPIO.OUT)

RPi.GPIO.setup(G, RPi.GPIO.OUT)

RPi.GPIO.setup(B, RPi.GPIO.OUT)


pwmR = RPi.GPIO.PWM(R, 70)

pwmG = RPi.GPIO.PWM(G, 70)

pwmB = RPi.GPIO.PWM(B, 70)


pwmR.start(0)

pwmG.start(0)

pwmB.start(0)


def main():

    """

    This function is executed automatically when the module is run directly.

    """

    options = OptionFlags.DEFAULT

    low_chan = 0

    high_chan = 3

    mcc_118_num_channels = mcc118.info().NUM_AI_CHANNELS

    sample_interval = 0.5  # Seconds

    light_index = 0


    try:

        # Get an instance of the selected hat device object.

        address = select_hat_device(HatIDs.MCC_118)

        hat = mcc118(address)


        print('\nMCC 118 single data value read example')

        print('    Options:', enum_mask_to_string(OptionFlags, options))

        try:

            input("\nPress 'Enter' to continue")

        except (NameError, SyntaxError):

            pass


        print('\nAcquiring data ... Press Ctrl-C to abort')


        SAKS.buzzer.off()


        try:

            while True:

                # Read a single value from each selected channel.

                value = hat.a_in_read(1, options)

                light_index = 100 - round(value * 1000 / 50)

                led_display(light_index)

                print('\r{:12.5} V'.format(value), '\tIndex:{:5.4}'.format(light_index), end='')


                stdout.flush()


                # Wait the specified interval between reads.

                sleep(sample_interval)


        except KeyboardInterrupt:

            # Clear the '^C' from the display.

            print(CURSOR_BACK_2, ERASE_TO_END_OF_LINE, '\n')


    except (HatError, ValueError) as error:

        print('\n', error)


    pwmR.stop()

    pwmG.stop()

    pwmB.stop()


    RPi.GPIO.cleanup()


def led_display(index):

    #print(index)

    pwmR.ChangeDutyCycle(index)

    pwmG.ChangeDutyCycle(index)

    pwmB.ChangeDutyCycle(100)

    SAKS.digital_display.show(("##%d" % int(index)))

    if index < 50:

        SAKS.ledrow.set_row([True, True, True, True, True, True, True, True])

    else:

        SAKS.ledrow.set_row([False, False, False, False, False, False, False, False])


if __name__ == '__main__':

    # This will only be run when the module is called directly.

    main()
六、小结
看起来在专业领域才会接触到的数据采集,实际上也可以应用在日常的 DIY 实验之中。MCC 118 这块数据采集卡配以完善的程序库和范例,是树莓派平台上很容易上手的数据采集方案。在它的帮助下,我的爱鱼也能实时感受到室外的天气变化了~
相关视频:
基于树莓派的电压采集模块MCC 118网络服务器范例
https://url.cn/utoHpkH2?sf=uri
基于树莓派的电压采集模块MCC 118数据记录仪例程
https://url.cn/VxXgwhEx?sf=uri
目前 MCC 118 扩展板可通过 Measurement Computing 公司官网购买获得 http://china.mccdaq.com。
有关本产品的相关问题和支持可以在 https://talk.quwj.com/topic/916 讨论,可获得 MCC 工程师专业的解答和技术支持。


发表评论