昨天的晚会让人脸识别又火了,转载一篇来自 CSDN JireRen 的精彩博文,借花献佛给大家一起尝试DIY树莓派上的人脸识别。
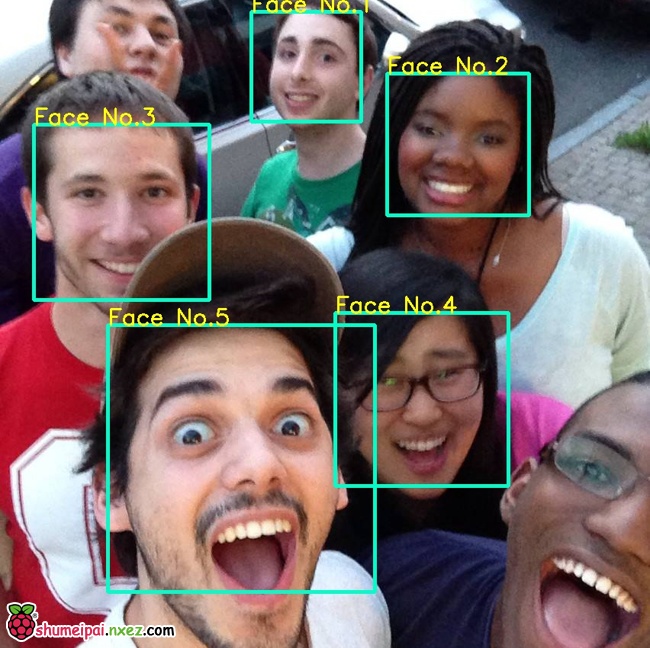
使用树莓派2和OpenCV制作一个简易的人脸识别和追踪系统。
所需硬件
需要:树莓派2、Pi Camera
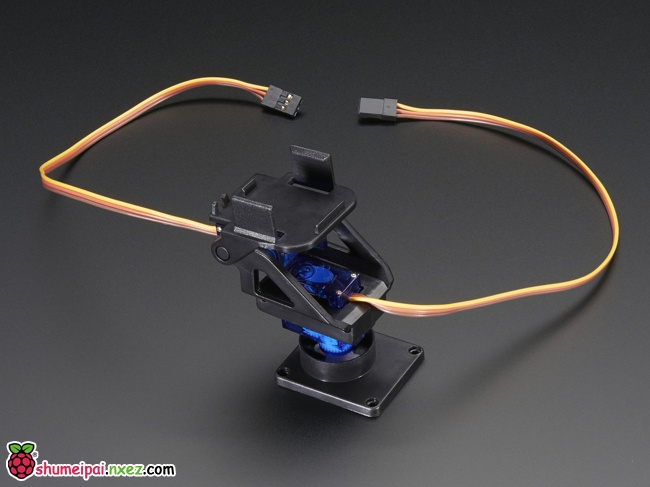
非必须(如果需要追踪人脸运动,需要一个有两个马达的小云台):云台
安装OpenCV
1 2 3 | sudo apt-get updatesudo apt-get upgradesudo apt-get install python-opencv |
安装PiCamera
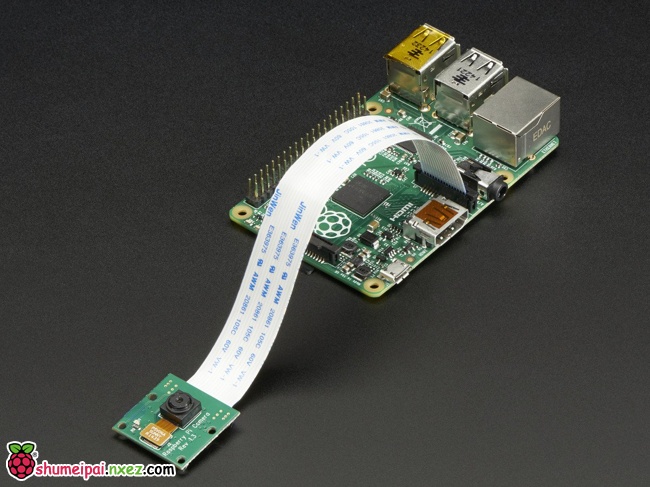
由于我没有使用USB摄像头,而是用了特殊的Pi Camera,样子如下图, 所以需要安装PiCamera来控制摄像头。
安装PiCamera:
1 2 3 | sudo apt-get install python-pip sudo apt-get install python-dev sudo pip install picamera |
至此人脸识别所需要的准备工作已经完成,可以使用下面的演示代码进行测试。
示例代码
Demo.1
第一个演示只使用单核,由于树莓派的性能有限,在只使用一个CPU核心的情况下视频的帧数非常之低,只有5帧左右,效果不太理想, 另外代码中通过Servo Blaster 控制云台的电机,来实现追踪人脸的功能,不过考虑到这个功能不是必须,所以不在此进行介绍。
1 2 3 4 5 6 7 8 9 10 11 12 13 14 15 16 17 18 19 20 21 22 23 24 25 26 27 28 29 30 31 32 33 34 35 36 37 38 39 40 41 42 43 44 45 46 47 48 49 50 51 52 53 54 55 56 57 58 59 60 61 62 63 64 65 66 67 68 69 70 71 72 73 74 75 76 77 | ### Imports ###################################################################from picamera.array import PiRGBArrayfrom picamera import PiCameraimport timeimport cv2import os### Setup ###################################################################### Center coordinatescx = 160cy = 120os.system( "echo 0=150 > /dev/servoblaster" )os.system( "echo 1=150 > /dev/servoblaster" )xdeg = 150ydeg = 150# Setup the cameracamera = PiCamera()camera.resolution = ( 320, 240 )camera.framerate = 60rawCapture = PiRGBArray( camera, size=( 320, 240 ) )# Load a cascade file for detecting facesface_cascade = cv2.CascadeClassifier( '/home/pi/opencv-2.4.9/data/lbpcascades/lbpcascade_frontalface.xml' ) t_start = time.time()fps = 0### Main ####################################################################### Capture frames from the camerafor frame in camera.capture_continuous( rawCapture, format="bgr", use_video_port=True ): image = frame.array # Use the cascade file we loaded to detect faces gray = cv2.cvtColor( image, cv2.COLOR_BGR2GRAY ) faces = face_cascade.detectMultiScale( gray ) print "Found " + str( len( faces ) ) + " face(s)" # Draw a rectangle around every face and move the motor towards the face for ( x, y, w, h ) in faces: cv2.rectangle( image, ( x, y ), ( x + w, y + h ), ( 100, 255, 100 ), 2 ) cv2.putText( image, "Face No." + str( len( faces ) ), ( x, y ), cv2.FONT_HERSHEY_SIMPLEX, 0.5, ( 0, 0, 255 ), 2 ) tx = x + w/2 ty = y + h/2 if ( cx - tx > 10 and xdeg <= 190 ): xdeg += 3 os.system( "echo 0=" + str( xdeg ) + " > /dev/servoblaster" ) elif ( cx - tx < -10 and xdeg >= 110 ): xdeg -= 3 os.system( "echo 0=" + str( xdeg ) + " > /dev/servoblaster" ) if ( cy - ty > 10 and ydeg >= 110 ): ydeg -= 3 os.system( "echo 1=" + str( ydeg ) + " > /dev/servoblaster" ) elif ( cy - ty < -10 and ydeg <= 190 ): ydeg += 3 os.system( "echo 1=" + str( ydeg ) + " > /dev/servoblaster" ) # Calculate and show the FPS fps = fps + 1 sfps = fps / ( time.time() - t_start ) cv2.putText( image, "FPS : " + str( int( sfps ) ), ( 10, 10 ), cv2.FONT_HERSHEY_SIMPLEX, 0.5, ( 0, 0, 255 ), 2 ) # Show the frame cv2.imshow( "Frame", image ) cv2.waitKey( 1 ) # Clear the stream in preparation for the next frame rawCapture.truncate( 0 ) |
[WPGP gif_id=”3055″ width=”600″]
另外请注意由于我使用HaarCascade来进行人脸检测, 需要使用到识别人脸的XML,这些人脸识别的XML文件是随着OpenCV一起安装的,不需要额外的安装, 不过当你在自己树莓派上运行时,请注意调整XML文件的路径, 就是调整这一行:
1 2 | # Load a cascade file for detecting facesface_cascade = cv2.CascadeClassifier( '你的XML文件路径' ) |
Demo.2
通过同时使用不同的XML文件,可以实现同时识别不同物体的功能,比如下面这段代码可以同时识别人脸和黑色手机,识别手机所需要的XML文件是由Radamés Ajna和Thiago Hersan制作的, 来源在这里。 更进一步的,我们可以根据自己的需要训练自己的Cascade文件,Naotoshi Seo在此处 给出了详细的教程, 比较简易的还有Thorsten Ball的香蕉识别教程。
1 2 3 4 5 6 7 8 9 10 11 12 13 14 15 16 17 18 19 20 21 22 23 24 25 26 27 28 29 30 31 32 33 34 35 36 37 38 39 40 41 42 43 44 45 46 47 48 49 50 51 52 53 54 55 56 57 58 59 60 61 | ### Imports ###################################################################from picamera.array import PiRGBArrayfrom picamera import PiCameraimport timeimport cv2import osimport pygame### Setup #####################################################################os.putenv('SDL_FBDEV', '/dev/fb1')# Setup the cameracamera = PiCamera()camera.resolution = ( 320, 240 )camera.framerate = 40rawCapture = PiRGBArray( camera, size=( 320, 240 ) )# Load the cascade files for detecting faces and phonesface_cascade = cv2.CascadeClassifier( '/home/pi/opencv-2.4.9/data/lbpcascades/lbpcascade_frontalface.xml' )phone_cascade = cv2.CascadeClassifier( 'cascade.xml' )t_start = time.time()fps = 0### Main ####################################################################### Capture frames from the camerafor frame in camera.capture_continuous( rawCapture, format="bgr", use_video_port=True ): image = frame.array # Look for faces and phones in the image using the loaded cascade file gray = cv2.cvtColor(image,cv2.COLOR_BGR2GRAY) faces = face_cascade.detectMultiScale(gray) phones = phone_cascade.detectMultiScale(gray) # Draw a rectangle around every face for (x,y,w,h) in faces: cv2.rectangle( image, ( x, y ), ( x + w, y + h ), ( 255, 255, 0 ), 2 ) cv2.putText( image, "Face No." + str( len( faces ) ), ( x, y ), cv2.FONT_HERSHEY_SIMPLEX, 0.5, ( 0, 0, 255 ), 2 ) # Draw a rectangle around every phone for (x,y,w,h) in phones: cv2.rectangle( image, ( x, y ), ( x + w, y + h ), ( 255, 0, 0 ), 2 ) cv2.putText( image, "iPhone", ( x, y ), cv2.FONT_HERSHEY_SIMPLEX, 0.5, ( 0, 255, 255 ), 2 ) # Calculate and show the FPS fps = fps + 1 sfps = fps / ( time.time() - t_start ) cv2.putText( image, "FPS : " + str( int( sfps ) ), ( 10, 10 ), cv2.FONT_HERSHEY_SIMPLEX, 0.5, ( 0, 0, 255 ), 2 ) cv2.imshow( "Frame", image ) cv2.waitKey( 1 ) # Clear the stream in preparation for the next frame rawCapture.truncate( 0 ) |
[WPGP gif_id=”3053″ width=”600″]
由于使用了更多的XML文件进行识别,帧数降低到了2~3帧。
Demo.3
为了解决帧数较低的问题,有一个比较简单的方法就是跳帧,可以不对每一帧图像都进行识别,而是隔几帧识别一次(因为最初因为懒不想将程序写成多线程,但是为了提高帧数,所以有了这个蛋疼的方法…)。
1 2 3 4 5 6 7 8 9 10 11 12 13 14 15 16 17 18 19 20 21 22 23 24 25 26 27 28 29 30 31 32 33 34 35 36 37 38 39 40 41 42 43 44 45 46 47 48 49 50 51 52 53 54 55 56 57 58 59 60 61 62 63 64 65 66 67 68 69 70 71 72 73 74 75 76 77 78 79 80 81 | ### Imports ###################################################################from picamera.array import PiRGBArrayfrom picamera import PiCameraimport timeimport cv2import osimport pygame### Setup #####################################################################os.putenv( 'SDL_FBDEV', '/dev/fb1' )# Setup the cameracamera = PiCamera()camera.resolution = ( 320, 240 )camera.framerate = 30rawCapture = PiRGBArray( camera, size=( 320, 240 ) )fcounter = 0facefind = 0# Load a cascade file for detecting facesface_cascade = cv2.CascadeClassifier( '/home/pi/opencv-2.4.9/data/lbpcascades/lbpcascade_frontalface.xml' )t_start = time.time()fps = 0### Main ####################################################################### Capture frames from the camerafor frame in camera.capture_continuous( rawCapture, format="bgr", use_video_port=True ): image = frame.array # Run the face detection algorithm every four frames if fcounter == 3: fcounter = 0 # Look for faces in the image using the loaded cascade file gray = cv2.cvtColor( image, cv2.COLOR_BGR2GRAY ) faces = face_cascade.detectMultiScale( gray ) print "Found " + str( len( faces ) ) + " face(s)" if str( len( faces ) ) != 0: facefind = 1 facess = faces else: facefind = 0 # Draw a rectangle around every face for ( x, y, w, h ) in faces: cv2.rectangle( image, ( x, y ), ( x + w, y + h ), ( 200, 255, 0 ), 2 ) cv2.putText( image, "Face No." + str( len( facess ) ), ( x, y ), cv2.FONT_HERSHEY_SIMPLEX, 0.5, ( 0, 0, 255 ), 2 ) facess = faces else: if facefind == 1 and str( len( facess ) ) != 0: # Continue to draw the rectangle around every face for ( x, y, w, h ) in facess: cv2.rectangle( image, ( x, y ), ( x + w, y + h ), ( 200, 255, 0 ), 2 ) cv2.putText( image, "Face No." + str( len( facess ) ), ( x, y ), cv2.FONT_HERSHEY_SIMPLEX, 0.5, ( 0, 0, 255 ), 2 ) fcounter += 1 # Calculate and show the FPS fps = fps + 1 sfps = fps / ( time.time() - t_start ) cv2.putText( image, "FPS : " + str( int( sfps ) ), ( 10, 10 ), cv2.FONT_HERSHEY_SIMPLEX, 0.5, ( 0, 0, 255 ), 2 ) cv2.imshow( "Frame", image ) cv2.waitKey( 1 ) # Clear the stream in preparation for the next frame rawCapture.truncate( 0 ) |
[WPGP gif_id=”3051″ width=”600″]
这样子帧数会提高到10帧左右,已经不像原来那么卡顿,但是当你移动速度很快的时候,识别框会出现滞后。
Demo.4
毕竟跳帧只是权宜之计,这个版本使用了全部的CPU核心,帧数稳定在了15帧左右。
1 2 3 4 5 6 7 8 9 10 11 12 13 14 15 16 17 18 19 20 21 22 23 24 25 26 27 28 29 30 31 32 33 34 35 36 37 38 39 40 41 42 43 44 45 46 47 48 49 50 51 52 53 54 55 56 57 58 59 60 61 62 63 64 65 66 67 68 69 70 71 72 73 74 75 76 77 78 79 80 81 82 83 84 85 86 87 88 89 90 91 92 93 94 95 96 97 98 99 100 101 102 103 104 105 106 107 108 109 110 111 112 113 114 115 116 117 118 119 120 121 122 123 124 125 126 127 128 129 130 131 132 133 134 135 136 137 | ### Imports ###################################################################from picamera.array import PiRGBArrayfrom picamera import PiCamerafrom functools import partialimport multiprocessing as mpimport cv2import osimport time### Setup #####################################################################os.putenv( 'SDL_FBDEV', '/dev/fb0' )resX = 320resY = 240cx = resX / 2cy = resY / 2os.system( "echo 0=150 > /dev/servoblaster" )os.system( "echo 1=150 > /dev/servoblaster" )xdeg = 150ydeg = 150# Setup the cameracamera = PiCamera()camera.resolution = ( resX, resY )camera.framerate = 60# Use this as our outputrawCapture = PiRGBArray( camera, size=( resX, resY ) )# The face cascade file to be usedface_cascade = cv2.CascadeClassifier('/home/pi/opencv-2.4.9/data/lbpcascades/lbpcascade_frontalface.xml')t_start = time.time()fps = 0### Helper Functions ##########################################################def get_faces( img ): gray = cv2.cvtColor( img, cv2.COLOR_BGR2GRAY ) faces = face_cascade.detectMultiScale( gray ) return faces, imgdef draw_frame( img, faces ): global xdeg global ydeg global fps global time_t # Draw a rectangle around every face for ( x, y, w, h ) in faces: cv2.rectangle( img, ( x, y ),( x + w, y + h ), ( 200, 255, 0 ), 2 ) cv2.putText(img, "Face No." + str( len( faces ) ), ( x, y ), cv2.FONT_HERSHEY_SIMPLEX, 0.5, ( 0, 0, 255 ), 2 ) tx = x + w/2 ty = y + h/2 if ( cx - tx > 15 and xdeg <= 190 ): xdeg += 1 os.system( "echo 0=" + str( xdeg ) + " > /dev/servoblaster" ) elif ( cx - tx < -15 and xdeg >= 110 ): xdeg -= 1 os.system( "echo 0=" + str( xdeg ) + " > /dev/servoblaster" ) if ( cy - ty > 15 and ydeg >= 110 ): ydeg -= 1 os.system( "echo 1=" + str( ydeg ) + " > /dev/servoblaster" ) elif ( cy - ty < -15 and ydeg <= 190 ): ydeg += 1 os.system( "echo 1=" + str( ydeg ) + " > /dev/servoblaster" ) # Calculate and show the FPS fps = fps + 1 sfps = fps / (time.time() - t_start) cv2.putText(img, "FPS : " + str( int( sfps ) ), ( 10, 10 ), cv2.FONT_HERSHEY_SIMPLEX, 0.5, ( 0, 0, 255 ), 2 ) cv2.imshow( "Frame", img ) cv2.waitKey( 1 )### Main ######################################################################if __name__ == '__main__': pool = mp.Pool( processes=4 ) fcount = 0 camera.capture( rawCapture, format="bgr" ) r1 = pool.apply_async( get_faces, [ rawCapture.array ] ) r2 = pool.apply_async( get_faces, [ rawCapture.array ] ) r3 = pool.apply_async( get_faces, [ rawCapture.array ] ) r4 = pool.apply_async( get_faces, [ rawCapture.array ] ) f1, i1 = r1.get() f2, i2 = r2.get() f3, i3 = r3.get() f4, i4 = r4.get() rawCapture.truncate( 0 ) for frame in camera.capture_continuous( rawCapture, format="bgr", use_video_port=True ): image = frame.array if fcount == 1: r1 = pool.apply_async( get_faces, [ image ] ) f2, i2 = r2.get() draw_frame( i2, f2 ) elif fcount == 2: r2 = pool.apply_async( get_faces, [ image ] ) f3, i3 = r3.get() draw_frame( i3, f3 ) elif fcount == 3: r3 = pool.apply_async( get_faces, [ image ] ) f4, i4 = r4.get() draw_frame( i4, f4 ) elif fcount == 4: r4 = pool.apply_async( get_faces, [ image ] ) f1, i1 = r1.get() draw_frame( i1, f1 ) fcount = 0 fcount += 1 rawCapture.truncate( 0 ) |
帧数上升到了13左右,而且识别框没有延迟。
[WPGP gif_id=”3048″ width=”600″]
Demo.5
搞定了低帧数问题,我又试了试多核加跳帧…帧数可到28帧左右。
1 2 3 4 5 6 7 8 9 10 11 12 13 14 15 16 17 18 19 20 21 22 23 24 25 26 27 28 29 30 31 32 33 34 35 36 37 38 39 40 41 42 43 44 45 46 47 48 49 50 51 52 53 54 55 56 57 58 59 60 61 62 63 64 65 66 67 68 69 70 71 72 73 74 75 76 77 78 79 80 81 82 83 84 85 86 87 88 89 90 91 92 93 94 95 96 97 98 99 100 101 102 103 104 105 106 107 108 109 110 111 112 113 114 115 116 117 118 119 120 121 122 123 124 125 126 127 128 129 130 131 132 133 134 135 136 137 138 139 140 141 142 143 144 145 146 147 148 149 150 151 152 153 154 | ### Imports ###################################################################from picamera.array import PiRGBArrayfrom picamera import PiCamerafrom functools import partialimport multiprocessing as mpimport cv2import os### Setup #####################################################################os.putenv( 'SDL_FBDEV', '/dev/fb0' )resX = 320resY = 240# Setup the cameracamera = PiCamera()camera.resolution = ( resX, resY )camera.framerate = 90t_start = time.time()fps = 0# Use this as our outputrawCapture = PiRGBArray( camera, size=( resX, resY ) )# The face cascade file to be usedface_cascade = cv2.CascadeClassifier( '/home/pi/opencv-2.4.9/data/lbpcascades/lbpcascade_frontalface.xml' )### Helper Functions ##########################################################def get_faces( img ): gray = cv2.cvtColor( img, cv2.COLOR_BGR2GRAY ) return face_cascade.detectMultiScale( gray ), imgdef draw_frame( img, faces ): global fps global time_t # Draw a rectangle around every face for ( x, y, w, h ) in faces: cv2.rectangle( img, ( x, y ),( x + w, y + h ), ( 200, 255, 0 ), 2 ) # Calculate and show the FPS fps = fps + 1 sfps = fps / (time.time() - t_start) cv2.putText(img, "FPS : " + str( int( sfps ) ), ( 10, 10 ), cv2.FONT_HERSHEY_SIMPLEX, 0.5, ( 0, 0, 255 ), 2 ) cv2.imshow( "Frame", img ) cv2.waitKey( 1 )### Main ######################################################################if __name__ == '__main__': pool = mp.Pool( processes=4 ) i = 0 rList = [None] * 17 fList = [None] * 17 iList = [None] * 17 camera.capture( rawCapture, format="bgr" ) for x in range ( 17 ): rList[x] = pool.apply_async( get_faces, [ rawCapture.array ] ) fList[x], iList[x] = rList[x].get() fList[x] = [] rawCapture.truncate( 0 ) for frame in camera.capture_continuous( rawCapture, format="bgr", use_video_port=True ): image = frame.array if i == 1: rList[1] = pool.apply_async( get_faces, [ image ] ) draw_frame( iList[2], fList[1] ) elif i == 2: iList[2] = image draw_frame( iList[3], fList[1] ) elif i == 3: iList[3] = image draw_frame( iList[4], fList[1] ) elif i == 4: iList[4] = image fList[5], iList[5] = rList[5].get() draw_frame( iList[5], fList[5] ) elif i == 5: rList[5] = pool.apply_async( get_faces, [ image ] ) draw_frame( iList[6], fList[5] ) elif i == 6: iList[6] = image draw_frame( iList[7], fList[5] ) elif i == 7: iList[7] = image draw_frame( iList[8], fList[5] ) elif i == 8: iList[8] = image fList[9], iList[9] = rList[9].get() draw_frame( iList[9], fList[9] ) elif i == 9: rList[9] = pool.apply_async( get_faces, [ image ] ) draw_frame( iList[10], fList[9] ) elif i == 10: iList[10] = image draw_frame( iList[11], fList[9] ) elif i == 11: iList[11] = image draw_frame( iList[12], fList[9] ) elif i == 12: iList[12] = image fList[13], iList[13] = rList[13].get() draw_frame( iList[13], fList[13] ) elif i == 13: rList[13] = pool.apply_async( get_faces, [ image ] ) draw_frame( iList[14], fList[13] ) elif i == 14: iList[14] = image draw_frame( iList[15], fList[13] ) elif i == 15: iList[15] = image draw_frame( iList[16], fList[13] ) elif i == 16: iList[16] = image fList[1], iList[1] = rList[1].get() draw_frame( iList[1], fList[1] ) i = 0 i += 1 rawCapture.truncate( 0 ) |
[WPGP gif_id=”3047″ width=”600″]
跳帧加多核,强行30帧哈哈,不过还是建议最终使用Demo4。
这篇博客节选翻译自我自己的课程报告, 同样的内容也出现于我自己的英文博客, 最后出镜的是我的搭档Andre Heil。
via 转自 JireRen 的博客。

大神能给个联系方式吗?我想学习
同求联系方式,我们在做大学生创新训练,希望大神可以指导。
求联系方式
求大神的注释,初学者看着恼火
大神给个联系方式被,萌新想学习一下
大佬可以指导下吗?
求大神联系方式