
昨天的晚会让人脸识别又火了,转载一篇来自 CSDN JireRen 的精彩博文,借花献佛给大家一起尝试DIY树莓派上的人脸识别。
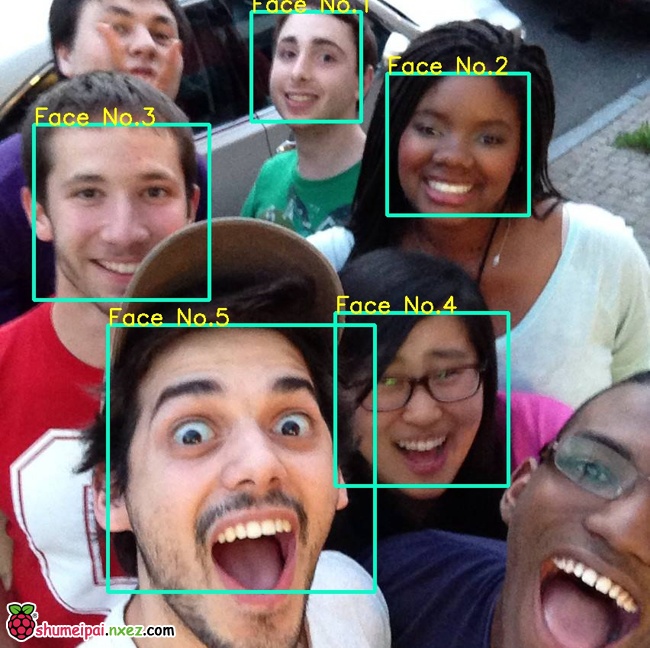
使用树莓派2和OpenCV制作一个简易的人脸识别和追踪系统。
所需硬件
需要:树莓派2、Pi Camera
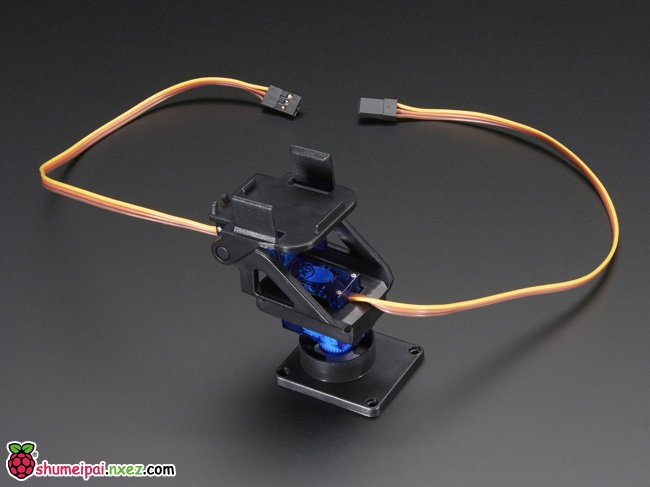
非必须(如果需要追踪人脸运动,需要一个有两个马达的小云台):云台
安装OpenCV
sudo apt-get update

sudo apt-get upgrade

sudo apt-get install python-opencv
安装PiCamera
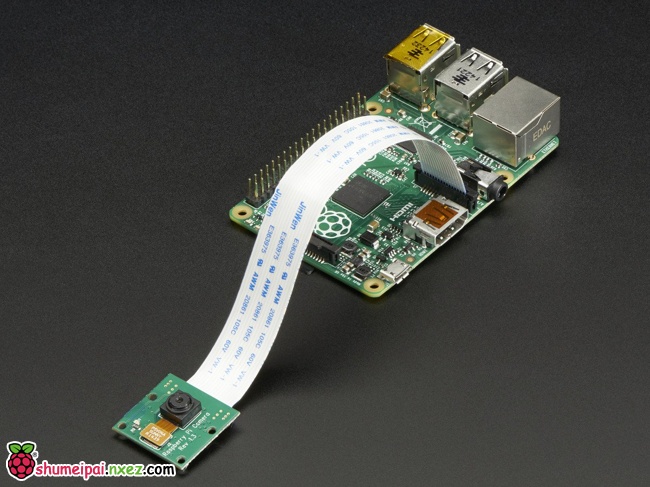
由于我没有使用USB摄像头,而是用了特殊的Pi Camera,样子如下图, 所以需要安装PiCamera来控制摄像头。
安装PiCamera:
sudo apt-get install python-pip

sudo apt-get install python-dev

sudo pip install picamera
至此人脸识别所需要的准备工作已经完成,可以使用下面的演示代码进行测试。
示例代码
Demo.1
第一个演示只使用单核,由于树莓派的性能有限,在只使用一个CPU核心的情况下视频的帧数非常之低,只有5帧左右,效果不太理想, 另外代码中通过Servo Blaster 控制云台的电机,来实现追踪人脸的功能,不过考虑到这个功能不是必须,所以不在此进行介绍。
### Imports ###################################################################


from picamera.array import PiRGBArray

from picamera import PiCamera

import time

import cv2

import os


### Setup #####################################################################


# Center coordinates

cx = 160

cy = 120


os.system( "echo 0=150 > /dev/servoblaster" )

os.system( "echo 1=150 > /dev/servoblaster" )


xdeg = 150

ydeg = 150


# Setup the camera

camera = PiCamera()

camera.resolution = ( 320, 240 )

camera.framerate = 60

rawCapture = PiRGBArray( camera, size=( 320, 240 ) )


# Load a cascade file for detecting faces

face_cascade = cv2.CascadeClassifier( '/home/pi/opencv-2.4.9/data/lbpcascades/lbpcascade_frontalface.xml' )


t_start = time.time()

fps = 0


### Main ######################################################################


# Capture frames from the camera

for frame in camera.capture_continuous( rawCapture, format="bgr", use_video_port=True ):


    image = frame.array


    # Use the cascade file we loaded to detect faces

    gray = cv2.cvtColor( image, cv2.COLOR_BGR2GRAY )

    faces = face_cascade.detectMultiScale( gray )


    print "Found " + str( len( faces ) ) + " face(s)"


    # Draw a rectangle around every face and move the motor towards the face

    for ( x, y, w, h ) in faces:


        cv2.rectangle( image, ( x, y ), ( x + w, y + h ), ( 100, 255, 100 ), 2 )

        cv2.putText( image, "Face No." + str( len( faces ) ), ( x, y ), cv2.FONT_HERSHEY_SIMPLEX, 0.5, ( 0, 0, 255 ), 2 )


        tx = x + w/2

        ty = y + h/2


        if   ( cx - tx >  10 and xdeg <= 190 ): xdeg += 3 os.system( "echo 0=" + str( xdeg ) + " > /dev/servoblaster" )

        elif ( cx - tx < -10 and xdeg >= 110 ):

            xdeg -= 3

            os.system( "echo 0=" + str( xdeg ) + " > /dev/servoblaster" )


        if   ( cy - ty >  10 and ydeg >= 110 ):

            ydeg -= 3

            os.system( "echo 1=" + str( ydeg ) + " > /dev/servoblaster" )

        elif ( cy - ty < -10 and ydeg <= 190 ): ydeg += 3 os.system( "echo 1=" + str( ydeg ) + " > /dev/servoblaster" )


    # Calculate and show the FPS

    fps = fps + 1

    sfps = fps / ( time.time() - t_start )

    cv2.putText( image, "FPS : " + str( int( sfps ) ), ( 10, 10 ), cv2.FONT_HERSHEY_SIMPLEX, 0.5, ( 0, 0, 255 ), 2 )


    # Show the frame

    cv2.imshow( "Frame", image )

    cv2.waitKey( 1 )


    # Clear the stream in preparation for the next frame

    rawCapture.truncate( 0 )
[WPGP gif_id=”3055″ width=”600″]
另外请注意由于我使用HaarCascade来进行人脸检测, 需要使用到识别人脸的XML,这些人脸识别的XML文件是随着OpenCV一起安装的,不需要额外的安装, 不过当你在自己树莓派上运行时,请注意调整XML文件的路径, 就是调整这一行:
# Load a cascade file for detecting faces

face_cascade = cv2.CascadeClassifier( '你的XML文件路径' )
Demo.2
通过同时使用不同的XML文件,可以实现同时识别不同物体的功能,比如下面这段代码可以同时识别人脸和黑色手机,识别手机所需要的XML文件是由Radamés Ajna和Thiago Hersan制作的, 来源在这里。 更进一步的,我们可以根据自己的需要训练自己的Cascade文件,Naotoshi Seo在此处 给出了详细的教程, 比较简易的还有Thorsten Ball的香蕉识别教程。
### Imports ###################################################################


from picamera.array import PiRGBArray

from picamera import PiCamera


import time

import cv2

import os

import pygame


### Setup #####################################################################


os.putenv('SDL_FBDEV', '/dev/fb1')


# Setup the camera

camera = PiCamera()

camera.resolution = ( 320, 240 )

camera.framerate = 40

rawCapture = PiRGBArray( camera, size=( 320, 240 ) )


# Load the cascade files for detecting faces and phones

face_cascade = cv2.CascadeClassifier( '/home/pi/opencv-2.4.9/data/lbpcascades/lbpcascade_frontalface.xml' )

phone_cascade = cv2.CascadeClassifier( 'cascade.xml' )


t_start = time.time()

fps = 0


### Main ######################################################################


# Capture frames from the camera

for frame in camera.capture_continuous( rawCapture, format="bgr", use_video_port=True ):


    image = frame.array


    # Look for faces and phones in the image using the loaded cascade file

    gray = cv2.cvtColor(image,cv2.COLOR_BGR2GRAY)

    faces  = face_cascade.detectMultiScale(gray)

    phones = phone_cascade.detectMultiScale(gray)


    # Draw a rectangle around every face

    for (x,y,w,h) in faces:

        cv2.rectangle( image, ( x, y ), ( x + w, y + h ), ( 255, 255, 0 ), 2 )

        cv2.putText( image, "Face No." + str( len( faces ) ), ( x, y ), cv2.FONT_HERSHEY_SIMPLEX, 0.5, ( 0, 0, 255 ), 2 )


    # Draw a rectangle around every phone

    for (x,y,w,h) in phones:

        cv2.rectangle( image, ( x, y ), ( x + w, y + h ), ( 255, 0, 0 ), 2 )

        cv2.putText( image, "iPhone", ( x, y ), cv2.FONT_HERSHEY_SIMPLEX, 0.5, ( 0, 255, 255 ), 2 )


    # Calculate and show the FPS

    fps = fps + 1

    sfps = fps / ( time.time() - t_start )

    cv2.putText( image, "FPS : " + str( int( sfps ) ), ( 10, 10 ), cv2.FONT_HERSHEY_SIMPLEX, 0.5, ( 0, 0, 255 ), 2 )


    cv2.imshow( "Frame", image )

    cv2.waitKey( 1 )


    # Clear the stream in preparation for the next frame

    rawCapture.truncate( 0 )
[WPGP gif_id=”3053″ width=”600″]
由于使用了更多的XML文件进行识别,帧数降低到了2~3帧。
Demo.3
为了解决帧数较低的问题,有一个比较简单的方法就是跳帧,可以不对每一帧图像都进行识别,而是隔几帧识别一次(因为最初因为懒不想将程序写成多线程,但是为了提高帧数,所以有了这个蛋疼的方法…)。
### Imports ###################################################################


from picamera.array import PiRGBArray

from picamera import PiCamera


import time

import cv2

import os

import pygame


### Setup #####################################################################


os.putenv( 'SDL_FBDEV', '/dev/fb1' )


# Setup the camera

camera = PiCamera()

camera.resolution = ( 320, 240 )

camera.framerate = 30

rawCapture = PiRGBArray( camera, size=( 320, 240 ) )


fcounter = 0

facefind = 0


# Load a cascade file for detecting faces

face_cascade = cv2.CascadeClassifier( '/home/pi/opencv-2.4.9/data/lbpcascades/lbpcascade_frontalface.xml' )


t_start = time.time()

fps = 0


### Main ######################################################################


# Capture frames from the camera

for frame in camera.capture_continuous( rawCapture, format="bgr", use_video_port=True ):


    image = frame.array


    # Run the face detection algorithm every four frames

    if fcounter == 3:


        fcounter = 0


        # Look for faces in the image using the loaded cascade file

        gray = cv2.cvtColor( image, cv2.COLOR_BGR2GRAY )

        faces = face_cascade.detectMultiScale( gray )


        print "Found " + str( len( faces ) ) + " face(s)"


        if str( len( faces ) ) != 0:

            facefind = 1

            facess = faces

        else:

            facefind = 0


        # Draw a rectangle around every face

        for ( x, y, w, h ) in faces:

            cv2.rectangle( image, ( x, y ), ( x + w, y + h ), ( 200, 255, 0 ), 2 )

            cv2.putText( image, "Face No." + str( len( facess ) ), ( x, y ), cv2.FONT_HERSHEY_SIMPLEX, 0.5, ( 0, 0, 255 ), 2 )

            facess = faces


    else:

        if facefind == 1 and str( len( facess ) ) != 0:


            # Continue to draw the rectangle around every face

            for ( x, y, w, h ) in facess:

                cv2.rectangle( image, ( x, y ), ( x + w, y + h ), ( 200, 255, 0 ), 2 )

                cv2.putText( image, "Face No." + str( len( facess ) ), ( x, y ), cv2.FONT_HERSHEY_SIMPLEX, 0.5, ( 0, 0, 255 ), 2 )


    fcounter += 1


    # Calculate and show the FPS

    fps = fps + 1

    sfps = fps / ( time.time() - t_start )

    cv2.putText( image, "FPS : " + str( int( sfps ) ), ( 10, 10 ), cv2.FONT_HERSHEY_SIMPLEX, 0.5, ( 0, 0, 255 ), 2 )


    cv2.imshow( "Frame", image )

    cv2.waitKey( 1 )


    # Clear the stream in preparation for the next frame

    rawCapture.truncate( 0 )
[WPGP gif_id=”3051″ width=”600″]
这样子帧数会提高到10帧左右,已经不像原来那么卡顿,但是当你移动速度很快的时候,识别框会出现滞后。
Demo.4
毕竟跳帧只是权宜之计,这个版本使用了全部的CPU核心,帧数稳定在了15帧左右。
### Imports ###################################################################


from picamera.array import PiRGBArray

from picamera import PiCamera

from functools import partial


import multiprocessing as mp

import cv2

import os

import time


### Setup #####################################################################


os.putenv( 'SDL_FBDEV', '/dev/fb0' )


resX = 320

resY = 240


cx = resX / 2

cy = resY / 2


os.system( "echo 0=150 > /dev/servoblaster" )

os.system( "echo 1=150 > /dev/servoblaster" )


xdeg = 150

ydeg = 150


# Setup the camera

camera = PiCamera()

camera.resolution = ( resX, resY )

camera.framerate = 60


# Use this as our output

rawCapture = PiRGBArray( camera, size=( resX, resY ) )


# The face cascade file to be used

face_cascade = cv2.CascadeClassifier('/home/pi/opencv-2.4.9/data/lbpcascades/lbpcascade_frontalface.xml')


t_start = time.time()

fps = 0


### Helper Functions ##########################################################


def get_faces( img ):


    gray = cv2.cvtColor( img, cv2.COLOR_BGR2GRAY )

    faces = face_cascade.detectMultiScale( gray )


    return faces, img


def draw_frame( img, faces ):


    global xdeg

    global ydeg

    global fps

    global time_t


    # Draw a rectangle around every face

    for ( x, y, w, h ) in faces:


        cv2.rectangle( img, ( x, y ),( x + w, y + h ), ( 200, 255, 0 ), 2 )

        cv2.putText(img, "Face No." + str( len( faces ) ), ( x, y ), cv2.FONT_HERSHEY_SIMPLEX, 0.5, ( 0, 0, 255 ), 2 )


        tx = x + w/2

        ty = y + h/2


        if   ( cx - tx > 15 and xdeg <= 190 ): xdeg += 1 os.system( "echo 0=" + str( xdeg ) + " > /dev/servoblaster" )

        elif ( cx - tx < -15 and xdeg >= 110 ):

            xdeg -= 1

            os.system( "echo 0=" + str( xdeg ) + " > /dev/servoblaster" )


        if   ( cy - ty > 15 and ydeg >= 110 ):

            ydeg -= 1

            os.system( "echo 1=" + str( ydeg ) + " > /dev/servoblaster" )

        elif ( cy - ty < -15 and ydeg <= 190 ): ydeg += 1 os.system( "echo 1=" + str( ydeg ) + " > /dev/servoblaster" )


    # Calculate and show the FPS

    fps = fps + 1

    sfps = fps / (time.time() - t_start)

    cv2.putText(img, "FPS : " + str( int( sfps ) ), ( 10, 10 ), cv2.FONT_HERSHEY_SIMPLEX, 0.5, ( 0, 0, 255 ), 2 )


    cv2.imshow( "Frame", img )

    cv2.waitKey( 1 )


### Main ######################################################################


if __name__ == '__main__':


    pool = mp.Pool( processes=4 )

    fcount = 0


    camera.capture( rawCapture, format="bgr" )


    r1 = pool.apply_async( get_faces, [ rawCapture.array ] )

    r2 = pool.apply_async( get_faces, [ rawCapture.array ] )

    r3 = pool.apply_async( get_faces, [ rawCapture.array ] )

    r4 = pool.apply_async( get_faces, [ rawCapture.array ] )


    f1, i1 = r1.get()

    f2, i2 = r2.get()

    f3, i3 = r3.get()

    f4, i4 = r4.get()


    rawCapture.truncate( 0 )


    for frame in camera.capture_continuous( rawCapture, format="bgr", use_video_port=True ):

        image = frame.array


        if   fcount == 1:

            r1 = pool.apply_async( get_faces, [ image ] )

            f2, i2 = r2.get()

            draw_frame( i2, f2 )


        elif fcount == 2:

            r2 = pool.apply_async( get_faces, [ image ] )

            f3, i3 = r3.get()

            draw_frame( i3, f3 )


        elif fcount == 3:

            r3 = pool.apply_async( get_faces, [ image ] )

            f4, i4 = r4.get()

            draw_frame( i4, f4 )


        elif fcount == 4:

            r4 = pool.apply_async( get_faces, [ image ] )

            f1, i1 = r1.get()

            draw_frame( i1, f1 )


            fcount = 0


        fcount += 1


        rawCapture.truncate( 0 )
帧数上升到了13左右,而且识别框没有延迟。
[WPGP gif_id=”3048″ width=”600″]
Demo.5
搞定了低帧数问题,我又试了试多核加跳帧…帧数可到28帧左右。
### Imports ###################################################################


from picamera.array import PiRGBArray

from picamera import PiCamera

from functools import partial


import multiprocessing as mp

import cv2

import os


### Setup #####################################################################


os.putenv( 'SDL_FBDEV', '/dev/fb0' )


resX = 320

resY = 240


# Setup the camera

camera = PiCamera()

camera.resolution = ( resX, resY )

camera.framerate = 90


t_start = time.time()

fps = 0


# Use this as our output

rawCapture = PiRGBArray( camera, size=( resX, resY ) )


# The face cascade file to be used

face_cascade = cv2.CascadeClassifier( '/home/pi/opencv-2.4.9/data/lbpcascades/lbpcascade_frontalface.xml' )


### Helper Functions ##########################################################


def get_faces( img ):


    gray = cv2.cvtColor( img, cv2.COLOR_BGR2GRAY )

    return face_cascade.detectMultiScale( gray ), img


def draw_frame( img, faces ):


    global fps

    global time_t


    # Draw a rectangle around every face

    for ( x, y, w, h ) in faces:

        cv2.rectangle( img, ( x, y ),( x + w, y + h ), ( 200, 255, 0 ), 2 )


    # Calculate and show the FPS

    fps = fps + 1

    sfps = fps / (time.time() - t_start)

    cv2.putText(img, "FPS : " + str( int( sfps ) ), ( 10, 10 ), cv2.FONT_HERSHEY_SIMPLEX, 0.5, ( 0, 0, 255 ), 2 )


    cv2.imshow( "Frame", img )

    cv2.waitKey( 1 )


### Main ######################################################################


if __name__ == '__main__':


    pool = mp.Pool( processes=4 )


    i = 0

    rList = [None] * 17

    fList = [None] * 17

    iList = [None] * 17


    camera.capture( rawCapture, format="bgr" )


    for x in range ( 17 ):

        rList[x] = pool.apply_async( get_faces, [ rawCapture.array ] )

        fList[x], iList[x] = rList[x].get()

        fList[x] = []


    rawCapture.truncate( 0 )


    for frame in camera.capture_continuous( rawCapture, format="bgr", use_video_port=True ):

        image = frame.array


        if   i == 1:

            rList[1] = pool.apply_async( get_faces, [ image ] )

            draw_frame( iList[2], fList[1] )


        elif i == 2:

            iList[2] = image

            draw_frame( iList[3], fList[1] )


        elif i == 3:

            iList[3] = image

            draw_frame( iList[4], fList[1] )


        elif i == 4:

            iList[4] = image

            fList[5], iList[5] = rList[5].get()

            draw_frame( iList[5], fList[5] )


        elif i == 5:

            rList[5] = pool.apply_async( get_faces, [ image ] )

            draw_frame( iList[6], fList[5] )


        elif i == 6:

            iList[6] = image

            draw_frame( iList[7], fList[5] )


        elif i == 7:

            iList[7] = image

            draw_frame( iList[8], fList[5] )


        elif i == 8:

            iList[8] = image

            fList[9], iList[9] = rList[9].get()

            draw_frame( iList[9], fList[9] )


        elif i == 9:

            rList[9] = pool.apply_async( get_faces, [ image ] )

            draw_frame( iList[10], fList[9] )


        elif i == 10:

            iList[10] = image

            draw_frame( iList[11], fList[9] )


        elif i == 11:

            iList[11] = image

            draw_frame( iList[12], fList[9] )


        elif i == 12:

            iList[12] = image

            fList[13], iList[13] = rList[13].get()

            draw_frame( iList[13], fList[13] )


        elif i == 13:

            rList[13] = pool.apply_async( get_faces, [ image ] )

            draw_frame( iList[14], fList[13] )


        elif i == 14:

            iList[14] = image

            draw_frame( iList[15], fList[13] )


        elif i == 15:

            iList[15] = image

            draw_frame( iList[16], fList[13] )


        elif i == 16:

            iList[16] = image

            fList[1], iList[1] = rList[1].get()

            draw_frame( iList[1], fList[1] )


            i = 0


        i += 1


        rawCapture.truncate( 0 )
[WPGP gif_id=”3047″ width=”600″]
跳帧加多核,强行30帧哈哈,不过还是建议最终使用Demo4。
这篇博客节选翻译自我自己的课程报告, 同样的内容也出现于我自己的英文博客, 最后出镜的是我的搭档Andre Heil。
via 转自 JireRen 的博客。

大神能给个联系方式吗?我想学习
同求联系方式,我们在做大学生创新训练,希望大神可以指导。
求联系方式
求大神的注释,初学者看着恼火
大神给个联系方式被,萌新想学习一下
大佬可以指导下吗?
求大神联系方式