
本文介绍在树莓派瑞士军刀扩展板升级到V2.0之后,如何对原先V1.X的教程做出适当修改之后应用到V2.0的方法。以下将通过链接引用V1.0的内容并附上差异说明和代码变更来对每一个DIY应用进行阐述。
开始之前,你需要了解SAKS V2.0在硬件和SDK上做了哪些变更,可以参考硬件变更、SDK变更:
由于V2.0的引脚顺序重新定义过,因此原有教程中的引脚编号对应表需要自行对应到新版本。另外,SDK升级说明中关于LED组的调用方法也请特别注意。虽然Github上我们将SDK的目录结构做了调整,但我们尽可能保证了对旧有代码的兼容性,main.py 主程序中对SDK的导入依然可沿用之前的方式无需变更。
Lv1,树莓派瑞士军刀扩展板上手把玩
1.1、轻松搞定 GPIO 开发环境(V1.X版例程)
环境的安装未变更。原例程中用了一个LED作为测试,由于新SAKS的LED必须通过寄存器来操作,因此这里先改用蜂鸣器来测试。在以后的教程中将说明LED组的使用方法。
对照原例程,Python代码修改为
# -*- coding: utf-8 -*-

import RPi.GPIO as GPIO

import time

# BOARD编号方式,基于插座引脚编号

GPIO.setmode(GPIO.BCM)

# 输出模式

GPIO.setup(12, GPIO.OUT)


while True:

    GPIO.output(12, GPIO.HIGH)

    time.sleep(1)

    GPIO.output(12, GPIO.LOW)

    time.sleep(1)
C代码修改为
#include <wiringPi.h>

int main(void)

{

    wiringPiSetup();

    pinMode (26, OUTPUT);

    for(;;)

    {

        digitalWrite(26, HIGH); delay (500);

        digitalWrite(26, LOW); delay (500);

    }

}
其他部分不变,测试效果为蜂鸣器发出哔声。
1.2、绚丽的流水灯(V1.X版例程)
SAKS V2.0 LED组的操作方式改用由一片74HC595芯片驱动,该芯片的使用方法查看这里。我们已经将该驱动封装在SAKS SDK中,要在SAKS上实现原文中的流水灯效果变得异常简易。而下面我们将介绍在不使用SDK的情况下如何驱动LED组以便大家能对LED组的操作原理有深入理解。
完整代码如下:
import RPi.GPIO as GPIO

import time


GPIO.setmode(GPIO.BCM)


DS = 6

SHCP = 19

STCP = 13


def init():

    GPIO.setup(DS, GPIO.OUT)

    GPIO.setup(SHCP, GPIO.OUT)

    GPIO.setup(STCP, GPIO.OUT)


    GPIO.output(DS, GPIO.LOW)

    GPIO.output(SHCP, GPIO.LOW)

    GPIO.output(STCP, GPIO.LOW)


def writeBit(data):

    GPIO.output(DS, data)


    GPIO.output(SHCP, GPIO.LOW)

    GPIO.output(SHCP, GPIO.HIGH)


#写入8位LED的状态

def writeByte(data):

    for i in range (0, 8):

        writeBit((data >> i) & 0x01)

    #状态刷新信号

    GPIO.output(STCP, GPIO.LOW)

    GPIO.output(STCP, GPIO.HIGH)


try:

    init()

    while True:

        #以下一组8个编码由一组二进制转换而成:

        #00000001,00000010,00000100,00001000,00010000,00100000,01000000,10000000

        #分别对应8个LED点亮状态

        for i in [0x01, 0x02, 0x04, 0x08, 0x10, 0x20, 0x40, 0x80]:

            writeByte(i)

            time.sleep(0.1)

        #LED组全开

        #writeByte(0xff)

        #time.sleep(0.1)


except KeyboardInterrupt:

    print "except"

    #LED组全关

    writeByte(0x00)

    GPIO.cleanup()
在终端运行下载本教程的源码库并进入到对应的源码目录,执行运行脚本的指令可看到效果:
git clone https://github.com/spoonysonny/SAKS-tutorials.git

cd SAKS-tutorials/water-lights

sudo python waterlights.py
1.3、通过串口登录树莓派(V1.X版例程)
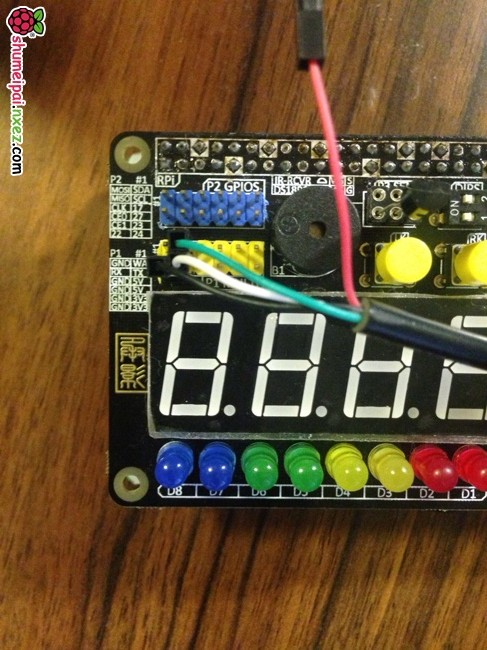
步骤和流程完全没有变,排针位置有调整,请按照扩展板上注释所示接线(RX、TX、GND 注释已标注)。
1.4、红色警报器(V1.X版例程)
将原代码中关于LED的部分注释掉(舍去LED闪烁效果)、修改蜂鸣器的引脚编号后即可正常运行。
PIN_NO_BEEP = 12

#PIN_NO_LED = 7


GPIO.setmode(GPIO.BCM)

GPIO.setup(PIN_NO_BEEP, GPIO.OUT, initial=GPIO.HIGH)

#GPIO.setup(PIN_NO_LED, GPIO.OUT, initial=GPIO.HIGH)


# 单次哔声和LED发光

def beep(seconds):

    GPIO.output(PIN_NO_BEEP, GPIO.LOW)

    #GPIO.output(PIN_NO_LED, GPIO.LOW)

    time.sleep(seconds)

    GPIO.output(PIN_NO_BEEP, GPIO.HIGH)

    #GPIO.output(PIN_NO_LED, GPIO.HIGH)
在终端运行下载本教程的源码库并进入到对应的源码目录,执行运行脚本的指令可看到效果:
git clone https://github.com/spoonysonny/SAKS-tutorials.git

cd SAKS-tutorials/chime

sudo python chime.py
1.5、浪漫小夜灯(V1.X版例程)
SAKS SDK将大部分方法的调用均保持了兼容,仅需要使用最新的SAKS SDK V2.0,经过小幅的调整即可适配到SAKS V2.0。
新的SDK不再支持 SAKS.ledrow.items[n].on() 这种用法了,将原代码修改为 SAKS.ledrow.on_for_index(n) 即可。
在终端运行下载本教程的源码库并进入到对应的源码目录,执行运行脚本的指令可看到效果:
git clone https://github.com/spoonysonny/SAKS-tutorials.git

cd SAKS-tutorials/nightlight

sudo python main.py
Lv2,树莓派瑞士军刀扩展板进阶例程
2.1、呼吸灯(V1.X版例程)
呼吸灯需要对IO口作PWM控制,而由于SAKS V2.0用来驱动LED的74HC595芯片并不支持该模式,因此无法实现该例程中的呼吸灯效果。
2.2、数字闹钟(V1.X版例程)
SAKS SDK将大部分方法的调用均保持了兼容,仅需要使用最新的SAKS SDK V2.0,经过小幅的调整即可适配到SAKS V2.0。将原代码中关于LED的部分注稍作调整后即可正常运行,其中关于LED操作的代码。
SAKS.ledrow.items[6].off()
改为
SAKS.ledrow.off_for_index(6)
SAKS.ledrow.items[6].on()
改为
SAKS.ledrow.on_for_index(6)
在终端运行下载本教程的源码库并进入到对应的源码目录,执行运行脚本的指令可看到效果:
git clone https://github.com/spoonysonny/SAKS-tutorials.git

cd SAKS-tutorials/digital-clock

sudo python main.py
Lv3,树莓派瑞士军刀扩展板实用应用
3.1、数字温度计(V1.X版例程)
SAKS SDK将大部分方法的调用均保持了兼容,仅需要使用最新的SAKS SDK V2.0,经过小幅的调整即可适配到SAKS V2.0。本例程的代码仅需要将原SDK更新到SAKS SDK V2.0即可正常运行。
传感器安插位置和方向请参考下图:
在终端运行下载本教程的源码库并进入到对应的源码目录,执行运行脚本的指令可看到效果:
git clone https://github.com/spoonysonny/SAKS-tutorials.git

cd SAKS-tutorials/temperature-display-ds18b20

sudo python main.py
3.2、CPU 温度显示和警报(V1.X版例程)
SAKS SDK将大部分方法的调用均保持了兼容,仅需要使用最新的SAKS SDK V2.0,经过小幅的调整即可适配到SAKS V2.0。本例程的代码仅需要将原SDK更新到SAKS SDK V2.0即可正常运行。
在终端运行下载本教程的源码库并进入到对应的源码目录,执行运行脚本的指令可看到效果:
git clone https://github.com/spoonysonny/SAKS-tutorials.git

cd SAKS-tutorials/CPU-temperature-display

sudo python main.py
3.3、树莓派关机键(V1.X版例程)
原例程中使用了单个LED的闪烁表示关机或重启前的状态。适配到SAKS V2.0上,我们需要对驱动LED的74HC595芯片操作方法做一个简单的封装来实现同样的效果。
修改后的完整代码如下:
import RPi.GPIO as GPIO

import time

import os,sys

import signal


#定义关机键和关机状态指示灯的GPIO引脚

GPIO.setmode(GPIO.BCM)

pin_btn = 20

DS = 6

SHCP = 19

STCP = 13


#初始化SAKS上相应按键,按键内部上拉

GPIO.setup(pin_btn, GPIO.IN, pull_up_down = GPIO.PUD_UP)


GPIO.setup(DS, GPIO.OUT)

GPIO.setup(SHCP, GPIO.OUT)

GPIO.setup(STCP, GPIO.OUT)


GPIO.output(DS, GPIO.LOW)

GPIO.output(SHCP, GPIO.LOW)

GPIO.output(STCP, GPIO.LOW)


#初始化按下关机键的次数

press_times = 0

#按下关机键后等待并倒数10次

count_down = 10

led_on_reboot = 0

led_on_halt = 0


def writeBit(data):

    GPIO.output(DS, data)


    GPIO.output(SHCP, GPIO.LOW)

    GPIO.output(SHCP, GPIO.HIGH)


#写入8位LED的状态

def writeByte(data):

    for i in range (0, 8):

        writeBit((data >> i) & 0x01)

    #状态刷新信号

    GPIO.output(STCP, GPIO.LOW)

    GPIO.output(STCP, GPIO.HIGH)


def onPress(channel):

    global press_times, count_down

    print('pressed')

    press_times += 1

    if press_times > 3:

        press_times = 1

    #重启模式

    if press_times == 1:

        #黄色LED亮

        writeByte(0x20)

        print('system will restart in %s' % (count_down))

    #关机模式

    elif press_times == 2:

        #红色LED亮

        writeByte(0x80)

        print('system will halt in %s' % (count_down))

    #模式取消

    elif press_times == 3:

        writeByte(0x00)

        print 'cancel'

        count_down = 10


#设置按键检测,检测到按下时调用 onPress 函数

GPIO.add_event_detect(pin_btn, GPIO.FALLING, callback = onPress, bouncetime = 500)


try:

    while True:

        #重启模式

        if press_times == 1:

            if count_down == 0:

                print "start restart"

                os.system("shutdown -r -t 5 now")

                sys.exit()

            led_on_reboot = not led_on_reboot

            #黄色 LED 闪烁

            if led_on_reboot:

                writeByte(0x20)

            else:

                writeByte(0x00)

        #关机模式

        if press_times == 2:

            if count_down == 0:

                print "start shutdown"

                os.system("shutdown  -t 5 now")

                sys.exit()

            led_on_halt = not led_on_halt

            #红色 LED 闪烁

            if led_on_halt:

                writeByte(0x80)

            else:

                writeByte(0x00)


        if press_times == 1 or press_times == 2:

            count_down -= 1

            print "%s second" % (count_down)

        time.sleep(1)

except KeyboardInterrupt:

    print('User press Ctrl+c, exit;')

finally:

    GPIO.cleanup()
在终端运行下载本教程的源码库并进入到对应的源码目录,执行运行脚本的指令可看到效果:
git clone https://github.com/spoonysonny/SAKS-tutorials.git

cd SAKS-tutorials/power-button

sudo python powerbutton.py
3.4、数字秒表(V1.X版例程)
SAKS SDK将大部分方法的调用均保持了兼容,仅需要使用最新的SAKS SDK V2.0,经过小幅的调整即可适配到SAKS V2.0。本例程的代码仅需要将原SDK更新到SAKS SDK V2.0即可正常运行。
在终端运行下载本教程的源码库并进入到对应的源码目录,执行运行脚本的指令可看到效果:
git clone https://github.com/spoonysonny/SAKS-tutorials.git

cd SAKS-tutorials/digital-stopwatch

sudo python main.py
Lv4,树莓派瑞士军刀扩展板挑战应用
4.1、PM2.5 指示灯(V1.X版例程)
SAKS SDK将大部分方法的调用均保持了兼容,仅需要使用最新的SAKS SDK V2.0,经过小幅的调整即可适配到SAKS V2.0。将原代码中关于LED的部分注稍作调整后即可正常运行。
SAKS.ledrow.items[n].on()
改为
SAKS.ledrow.on_for_index(n)
SAKS.ledrow.items[n].off()
改为
SAKS.ledrow.off_for_index(n)
在终端运行下载本教程的源码库并进入到对应的源码目录,将代码中的 cityid 和 key 根据实际情况替换。执行运行脚本的指令可看到效果:
git clone https://github.com/spoonysonny/SAKS-tutorials.git

cd SAKS-tutorials/pm25-display

sudo python main.py
4.2、站点宕机指示(V1.X版例程)
原例程中使用了单个LED的闪烁表示关机或重启前的状态。适配到SAKS V2.0上,我们需要对驱动LED的74HC595芯片操作方法做一个简单的封装来实现同样的效果。
关键代码修改如下:
def writeBit(data):

    GPIO.output(DS, data)


    GPIO.output(SHCP, GPIO.LOW)

    GPIO.output(SHCP, GPIO.HIGH)


#写入8位LED的状态

def writeByte(data):

    for i in range (0, 8):

        writeBit((data >> i) & 0x01)

    #状态刷新信号

    GPIO.output(STCP, GPIO.LOW)

    GPIO.output(STCP, GPIO.HIGH)


while True:

    check()

    #正常状态,绿灯亮

    if status == 200:

        writeByte(0x04)

    #异常状态,黄灯亮

    elif status == 500 or status == 404 or status == 403:

        writeByte(0x10)

    #错误状态,红灯亮

    else:

        writeByte(0x40)
在终端运行下载本教程的源码库并进入到对应的源码目录,执行运行脚本的指令可看到效果:
git clone https://github.com/spoonysonny/SAKS-tutorials.git

cd SAKS-tutorials/site-check

sudo python sitecheck.py
本文属于《树莓派瑞士军刀扩展板(SAKS)DIY 教程》系列文章,查看系列文章目录,请访问:../../../swiss-army-knife-shield-for-raspberry-pi-diy-tutorials

蜂鸣器的那个例子里,蜂鸣器端口的GPIO.BCM的代码貌似不是32而是12噢
已修正,感谢指正
pi@xux:/xx/dao/test $ python bibi.py
bibi.py:7: RuntimeWarning: This channel is already in use, continuing anyway. Use GPIO.setwarnings(False) to disable warnings.
GPIO.setup(12, GPIO.OUT)
^CTraceback (most recent call last):
File “bibi.py”, line 11, in
time.sleep(1)
KeyboardInterrupt
运行脚本的时候 如果在响的时候停掉,蜂鸣器可能会一直响
再次执行脚本的时候会如上报错
中断了一直响是正常的,因为电平没有被归位。 脚本报错这个需要具体看代码。
请问怎么直接恢复所有电平?